Using the G3 Pro Punch Device
Accessing the Main Menu
- When the device is on standby, click on the menu button
on the top-right of the screen.
- Enter the User ID (this is determined from the ZKTime Small Business Software).
- Select the authentication method to use (Passcode, Face, Palm).
- Once logged in, you will be taken to the main menu.
Communication Settings Sub-Menu
- After logging in to the main menu, select the third icon labelled Comm.
- This will open the following sub-menu:
- Select 'Ethernet'. This will take you to the Ethernet profile.
- You can edit the IP Address, Subnet Mask, Gateway, DNS, TCP COMM.Port from here.
- It is recommended to keep DHCP switched off and assign the device a static IP address.
User Management Sub-Menu
To check that the users have been pushed from ZKTime Small Business to the punch device, press on the User Mgt. icon  on the top-left of the main menu. User Mgt. gives you 3 options: New User, All Users, and Display Style.
- New User: select this to add a new user. (Note: this is not recommended, as users must always be created from the ZKTime Small Business software and pushed/synced to the punch device.)
- All Users: select this menu to check the details of all the users synced on the device.
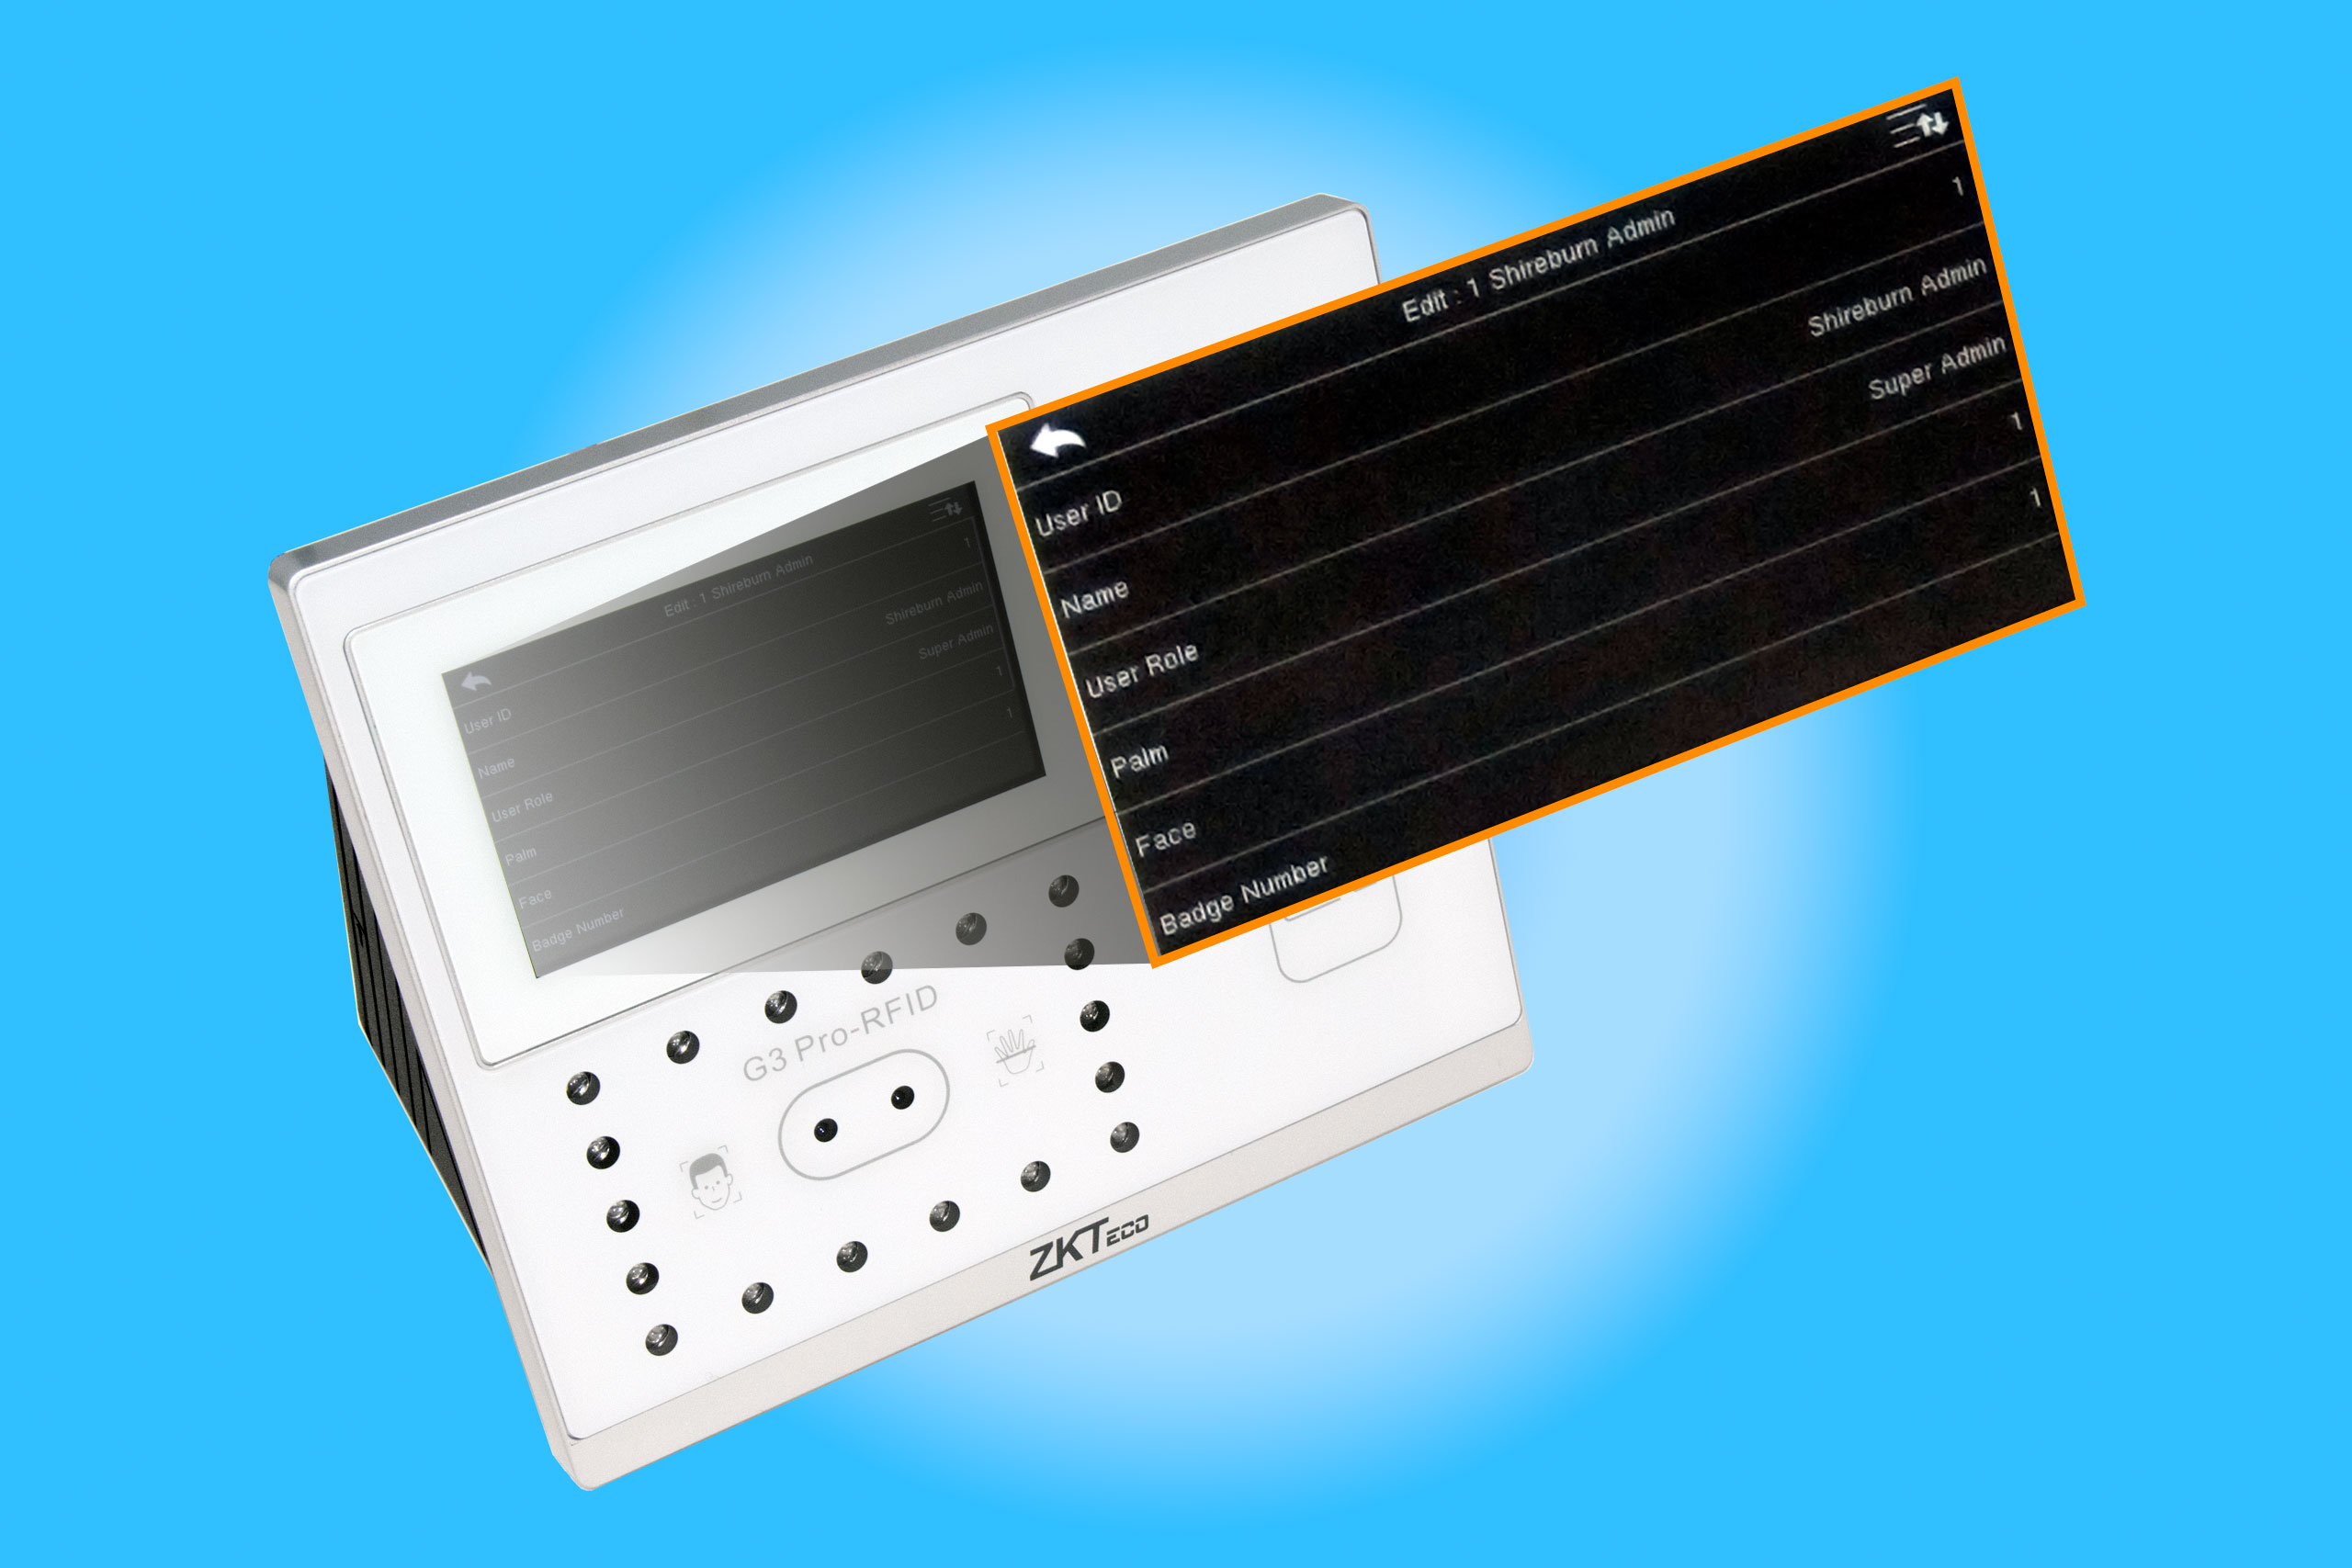
Enrol an Employee's Biometrics
- Select the employee whose biometrics you wish to enrol.
- You will be prompted with 'Edit' and 'Delete' options. Press 'Edit' to access the employee's settings.
- Here you will be able to makes changes to the user's role (normally this is done from ZKTime Small Business), as well as enrol face and palmprint biometrics, or set a passcode.
- Enrolling a user's palmprint biometrics:
- Select 'Palm'.
- Hold up your hand, palm facing the device, and follow the instructions on the display screen.
- Enrolling a user's facial biometrics:
- In the 'Edit User' menu, select 'Face'.
- Look at the device, making sure to follow the instructions on the screen.
- Delete Option: by selecting the 'Delete' option in the User menu, you will be taken to the Delete sub-menu. From here, you can:
- Delete the user from the device (this will not delete the user from the database).
- Delete any information or biometrics set for the selected user.

It is best to delete a user from all devices using the ZKTime Small Business option Delete employee data. This will delete all details of the employee from all the punch devices at once. You must then delete the user in ZKTime Small Business by going to Staff Management > Staff.

1. You can check if facial and palmprint biometrics are enrolled via the Edit User sub-menu. In the below example, you can see both the face and palmprint have been enrolled for this user.
2. If a user profile has only one biometric saved, selecting Delete for that biometric will prompt the warning: 'User has no data enrolled, continue to delete?' with the options of OK and Cancel. Pressing OK will delete the biometric data.
Related articles:
Related Articles
Using the SilkBio and UA150 Punch Devices
These instructions apply to the following devices: SilkBio-101TC UA150 Accessing the Main Menu Press M/OK on the device. Enter the User ID (this is determined via ZK Small Business Software). Select type of authentication method to use (Passcode, ...Using the SpeedFace or Pro Face X Punch Devices
These instructions apply to the following devices: SpeedFace V3L V4L V5L Pro Face X Accessing the Main Menu When the device is on standby, press the Menu button (the icon with three horizontal lines). When asked to verify, enter your User ID. Select ...Using the uFace 402 Punch Device
Accessing the Main Menu When the device is on standby, click on the menu button on the top-right of the screen. Enter the User ID (this is determined from the ZKTime Small Business Software). Select the authentication method to use (Passcode, Face, ...ZKTime Small Business
Creating a New Employee Go to Staff management and select Staff. Click on the Data tab and enter the following details: Code: employee code or punch number. Important: leading 0s are generated automatically by ZKTime Small Business, but not used in ...Setting Up and Using the Intercompany Journal
Setting up Inter-company Accounts makes it easy to automatically update journal entries in multiple companies, helping you increase your efficiency. Step 1: Creating an Intercompany Account Log in on one of the companies required for the multiple ...
Recent Articles
How to generate a Report by Transaction Type and Analysis Code
Generating a Report by Transaction Type in SIMS Navigate to SIMS > Reports > Miscellaneous > Analysis Code. From this screen, select the desired Transaction Type to apply as a filter. If a summarized version of the report is required, tick the ...How to Set Off a Client / Supplier
The Set Off functionality in SFM allows you to offset outstanding balances between a client and a supplier when the same entity exists in both roles. This feature is particularly useful when a company has pending sales invoices due from a client, ...Exporting or Importing Documents in Windows App
Using the Correct Redirected Path When connected through the AVD Windows app, you must export or import files using the redirected drives. Internal AVD paths (such as C:\Users or Desktop inside the session) do not allow saving and will cause ...How to Activate Advanced Commission
Advanced Commission Overview The Advanced Commission feature provides the ability to customize commission settings for all salespersons within the system. Enabling Salesperson Commission To activate this functionality, navigate to: SIMS > Admin > ...How to Delete a user on SIMS
Note: We do not recommend deleting a user from SFM for audit and compliance purposes. Example: If you have a user with the initials JD (John Doe), and that user has previously submitted entries as shown below, deleting the user will remove the ...
Popular Articles
How do I process an End Of Year in SFM?
Overview SFM allows posting into two financial years simultaneously. This means that users do not need to finalise 2025 before starting to post entries into 2026. The end of year procedure will move the “Current Year” data into the "Previous Year". ...Do I need to Process an End-of-Year in SIMS?
SIMS does not require an end of year procedures to be run. However, SIMS controls users to only allow posting of transactions, such as sales invoices, cash sales, adjustments and purchases, within a range of dates referred to as the Posting Period. ...How to setup a System Control Account in SFM? (Bank Account, Cash Account, Stock Control, etc...)
Create the Account in your Chart of Accounts as seen below. Please make sure you use the code depending on your Heading and Sub-Heading digits. After creating the account, you need to specify the account as a System Control Account. Go to Support > ...How to reset your Shireburn remote desktop service (RDS) account password
The password for the Shireburn RDS Account used to connect to RDS server is set to expire after 90 days. A notification is provided to the user daily starting 5 days prior to the expiry date. In order to change password, the following steps need to ...SIMS - User Manual
The attached PDF includes the necessary functions and features of SIMS to get you started. SIMS User Manual.pdf